Building a Perfect Kayak: Part Seven
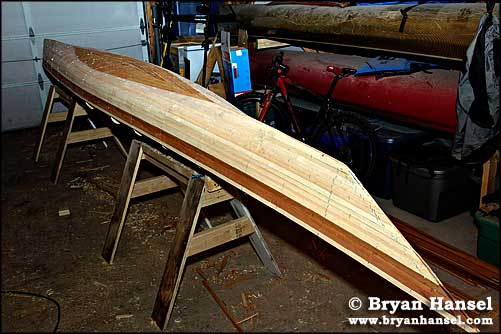
We may earn commissions if you shop through the links below. Subscribe to Blog via Email Enter your email address to subscribe to this blog and receive notifications of new posts by email. Email Address Subscribe Having finished the bottom of the kayak, I flipped it over and for the first time got to see – I mean really see – my kayak. It was a stunning moment. Not only did the stems look true to each other and not twisted (I guess all the work I did beating the heck out of my strong back worked,) but also the shape and rise of the sheer line was fair and beautiful. I quickly cleaned up the shop and got the tape measure out. The first and only measurement I took was from the rear deck, which is much higher than I had hoped, so I’ll have to build some kind of recess in the rear deck in order to bring my coming height down. The boat seems to have more storage than I had hoped, but it doesn’t seem like it will be too big. For touring it seems that it may be just right. (Much more storage than my old boat, the Fool’s Gold. The volume seems to be closer to that of the King or maybe the Perception Eclipse, than the Chatham or Explorer. And it seems that I might be able to use my Sealline 20HD bags again, instead of just 10HDs. Sweet! Figuring out Cockpit Placement Join REI and Earn $30 towards your next gear purchase. Before I started stripping the deck, I needed to figure out cockpit placement, because I may be cutting it close in the number of strips that I have, and I don’t want to have to mill more up, so if I can skip stripping part of the deck all the better. Since there doesn’t seem to be that many good rules of thumb and because of the myriad of cockpit shapes, I needed to do some figuring. Poring through old Sea Kayaker magazines, I quickly did some measurements of cockpit placements vs. center of buoyancy for the Chatham 16 and the Romany Explorer. I had hoped that these measurements would give me some kind of average percentage of the distance that the front and back of the cockpit was from the center of buoyancy, but, unfortunately, they didn’t align well. The Explorer is 37.5% in front and 62.5% behind the center of buoyancy for the front and back of the cockpit, respectively. And the Chatham came out to be 45% and 55%. Discouraged from using a magazine, I looked back at the HULLS design to get a better view of my kayak. When I designed the kayak, I quickly used HULLS’ sitting person to figure out my deck, and what I did was to align the figure’s chest with the Center of Buoyancy. This, I figured, would get me close enough, but with the difference in placements of the Chatham and Explorer, I knew I would have to figure out another way to do it. So, my first step was to find my center of mass, and use this center of mass to align to the boats Center of Buoyancy. Then once I knew my center of mass, I could figure out how that center compared to the front and back of the cockpit of my Necky Blunt, which has a cockpit that I want to use on this new kayak. After using a balance board to find my center of mass, I located the backrest position of the cockpit by running a framing square up to the middle of my back. It ended up that the backrest according to the balance board was 12″ away from my center of mass and by balancing my mass with the kayak’s Center of Buoyancy, I concluded that the back band should be 12″ away from the Center of Buoyancy. Sitting in the cockpit of my Blunt, I found my back to be 3.5″ from the back of the opening. So, I added the two together and found that the opening should start 15.5″ from the Center of Buoyancy. I wanted to give myself a slight fudge factor, so I’ve decided to set the cockpit opening in the back at 16″ from Cb and the front will be 14″ in front of the Cb. This ends up being a 55% / 45% split just like the Chatham. The other nice thing that this alignment does is makes the front bulkhead align perfectly with one of the forms for the kayak. This will make it easy for making a bulkhead that fits perfectly. Cockpit Placement Rule of Thumb New Rule of Thumb = The aft of the cockpit opening should be positioned 3.5″ from the back of the paddler when the paddler’s Center of Mass and the kayaks Center of Buoyancy are aligned. Or for most paddler’s 14″ to 16″ behind the Cb. (Using this rule, weighing 200 lbs., I end up at 15.5″ and my girlfriend who weighs 135 lbs ends up at 14.5″. We both have average Midwestern builds.) A Compass Mount The second item that I needed to account for and plan for before building the deck of this boat is the compass mount. I bought a Nexus compass for my last kayak, and when I sold it, I took it out for the next boat. When designing the deck, I tried to add some height to the bow of the boat before where I visualized my hatch cover would sit. This height was designed to be cut out so that the compass would have a recess to sit in. The Nexus compass has to be mounted at an angle so the driver can see the degree scale. My deck design sort of worked, but I’ll have to build in some sort cut out to make it work perfectly. If I was using Valley rubber hatches, I could make it look just like any British style kayak, but since I’m doing flush hatch covers this won’t work. Cedar Strip Deck Designs Wiping the sweat from my brow, I tackled the third item that needed accounted for: the design of the deck. I had drawn up several patterns, but because I only have cedar left, I decided to make a plain Jane simple cedar deck, and I’ll inlay a moon disk reflected in water with two Lake Trout, Namycush, swimming in it. The trout will be constructed in a Northwestern Native American style. This will be the only inlay on the boat. I’m cutting back the number of planed inlays to make the one of the deck stand out more, because the deck will be only out of cedar. The moon disk with have a radius of around 18″. Stripping the Deck After figuring out a deck layout, the first step for stripping the deck is to do the sheer strip. I had to plane the sheer strip on the hull first to get a perfect fit with the deck’s sheer strip. After doing that it was an easy step to start stripping the kayak, but I hit a snag: eight strips into the deck, I noticed a bump at the 20.75″ form. So, much for being able to keep a fair deck by turning auto-spline off in HULLS and moving the points myself (so much for my compass mount idea). So, off came the deck, and eight strips from my already dwindling pile of strips were gone. It’s looking increasingly like I’ll have to mill up a new board. At least, on the rear deck I won’t have to bead and cove if I have to mill up more. The second problem, I decided to fix after tearing the deck off involved the stem and about the first 18″ of the kayak. In most kayaks I like, the deck pinches as it nears the ends. So, I removed the 20.75″ form and used a couple of blocks and nails to pull the sheer line towards the centerline and create a nice pinch at the ends. This new shape made the loss of eight much needed strips worth it. Surprisingly, the stem still looks nice and fair. This is a constant problem that I’ve had when designing kayaks with HULLS; it seems like the ends of the kayak is always too wide and too flat. I’ll have to play around with HULLS more and see if there is a way to introduce pinch into the ends of a kayak. The third problem, which I decided not to fix, involved the width of the kayak at the 48″ form sheer line. Unfortunately for me, most kayaks at this mark have a max width of somewhere around 13″ at this station for the sheer line. Mine is just under 15″. Two inches doesn’t seem like a huge amount to worry about, but it does actually make a 21″ kayak seem much broader than 21″. I’ve formulated a new rule of thumb for designing kayaks. New Rule of Thumb Two: At the 48″ form, when designing touring kayaks, make sure that the kayak is no wider than 13.5″ at the sheer line. The forth problem was that the deck was too big, too high, and too flat in front of the cockpit, so I went back into HULLS and redesigned the deck. Then a jigsaw, tape measure and a couple of hours later, I had my new deck design cut into the forms. So much for my compass mount. It’s gone. The deck looks much better, but not as perfect as I had hoped. At the 48″ form (bad form, bad form) the deck flattens out. Rubber hatches could fix that real easy like. After my problems were solved, I started to strip the deck. I decided to run the sheer strip along the sheer of the boat, but run the rest of the deck strips from tip to tail. So, at each strip, I had to fit, at least, one end, and on several strip both ends with a bit of tedious sawing and planning. It wasn’t until the rear deck that I figured out that a utility knife and block plane is much faster than using a pull saw and block plane is. You’d think I’d have figured that out by now; this is my 7th boat after all. It seems to me that the deck has taken much longer than the hull, so I pulled out my handy excel time tracking sheet and have found that indeed the deck has taken longer than the hull. The hull took me 17 hours to strip, but the deck has taken 21 hours. Plus, because of my problems with the deck, it has been much more stressful. The big romantic notion to be locked away in the back of a dim dusty garage planning away at some form of a wooden boat as you see in commercials, TV shows, and elsewhere, like it’s every man’s dream to build boats to explore the great oceans, is shattered when you’re in the thick of the battle, so to speak. Times like this it suddenly becomes less romantic. Then a nice cool Lake Superior breeze blow in through the garage door and helps to calm the boat builder down. That breeze is the reason, I think, all boat builders should be based on the lake. How else do boat builders calm their stress levels down? The Cockpit Recess or the Layback Lounge (TM pending) Since, Redfish Kayaks own the trademark to Roller’s Recess, I’ve had to come up with a new term, and mine is Layback Lounge. To me this term epitomizes the joys and the dangers of paddling. During paddling, you can kick back, relax, and just layback and lounge, but during moments of danger if your kayak goes over, you need to layback and roll that baby upright again. No really, I needed to make a...
Bryan Hansel