Building a Perfect Kayak: Part Six
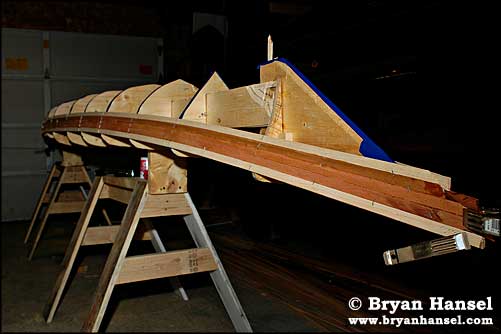
We may earn commissions if you shop through the links below. Those Little Setbacks in Boat Building My old strong back was beautiful. Built from some of the best 16′ 2x8s I’ve ever seen, and topped with a lovely almost clear 16′ 1×6, the strong back was straight true, and had proven it on several canoes. But as all great things come to an end, my strong back ended its life on a burn pile in the woods somewhere. I gave it away before moving to Minnesota, and they left it in the rain and the snow, and by spring, it was done. Firewood it became. My current strong back, unlike my old one, is a hunk of junk. Somehow, somewhere, between last night and today, it developed a slight twist. So, after much work this morning, I managed to beat the heck out of it, and now it’s back in shape. This brings me to my point, and my point is this: Internal strong backs have one heck of a design flaw that is much harder to overcome than with an external strong back. That design flaw will only show up on strong backs that have a slight twist in them. With an external strong back, you run a string line from stem to stem and then plumb down from the string line to make sure that each form is set up in perfect alignment with each other. If the strong back is slightly twisted, it doesn’t mater, because as long as you string line is straight, the string cannot develop a twist, and because you are aligning to that string, which can’t twist, you are pretty much guaranteed a straight untwisted boat. But with an internal strong back, even when running a string line, it is much harder to work out the twist. Mainly because you have only several inches of the centerline above the strong back to run your plumb stick. In addition because of the 2×4 cut outs being only 2×4, you also have much less of the ability to move the stations around for perfect alignment. My conclusion is this: next time I’ll use an external strong back, or find a very nice straight and untwisted 2×4 or one of those composite box beams, which are 100% straight – at least the ones that I’ve seen. This final solution is really the best solution for internal strong backs. These new composite beams would be a worthwhile investment for kayak building. Anyway, I’ve managed to work out my strong back problem, and moved onto the striping of the kayak. A Short Break Before starting to strip the kayak, I wandered down to the post office to take care of a few things that needed to be taken care of. (It’s funny how boat building can distract you if you’re self-employed from doing those things that make money.) Then came back, and as I was walking back home I looked out at Lake Superior. I find it funny that I live within three blocks of the shore, and look at the lake every day, but in the last two weeks, I haven’t been down to the shore to stick my feet in the cold water. Something, I would have been mystified by before I moved here. Still, I want to name this design and kayak after Lake Superior and so far have come up with a few names and have received some nice suggestions: Mine: From Kim Woodman via the Kayak Forum: From Steve B. via the Kayak Forum: From Charlie Fronzek via the Kayak Forum: From J.R. Ackley via the Kayak Forum: From Glen Smith via Bear Mountain Builder’s BBS And, of course, from Will N. the Edmund Fitzgerald II. But I think I’ll pass on that one. If you have suggestions, please, pass them on. It has to do with Lake Superior. Stripping the Kayak With the forms cut, set-up, and aligned correctly, and a small break to look at Superior, I moved into the next step of the project – stripping. During stripping, the cedar strips that I milled (it seems so long ago) a couple of days ago are attached to the forms. This is one of the most fun steps, but also one that requires tremendous amount of brainpower and thought. Each strip that you put on the kayak, changes the look of the boat, so you have to determine if you are going to make a pattern, do inlays, keep it simple, alternate colors of strips, etc… The main problem is that all these options turn out good-looking boats. So far, I’ve been toying with a couple of ideas, and in the end, simplicity won out. The hull of the kayak will have a dark strip of three cedar strips surrounded by pine, and in the football section of the kayak (the center of the bottom) will have a design from strips built into the kayak. The hull will also have an inlay on each side near the bow of the boat. I’m still working on the design of the inlay. In the following pictures, you can see the progress of stripping the hull of the kayak. At a point before the bilge is turned, it always looks like the boat is going to be much larger than it is in reality. Kind of scary when you’ve designed the kayak from ground up. Tip for Stubborn Strips Occasionally, you will find a strip here or there, usually near the stems of the kayak that doesn’t want to stay attached to the form for whatever reason. This is often from the torque the strip is put through as it runs along the bottom of the boat and then has to turn 90 degrees to become part of the stem. Because, I’m using staples to attach the strips to the forms, I don’t mind using nails. What I do to hold stubborn strips is to drill a small hole in the strip and then a small hole in a scrap strip and I pound a 2″ 6D finishing nail through both. The scrap strip keeps the nails head out of the kayak where it becomes nigh impossible to remove. This method leaves a slightly larger hole than a staple, but saves time during the stripping process. The other method that works very well is to cut a “U” shaped piece out of 1/2 ” plywood and clamp it to the form with enough pressure to hold the strip into place. The problem with this is that you have to wait for the glue to dry before you move on. This is also a way that kayak and canoe builders build their boats without staples. I have a ton of respect and am envious of builders who use this method. Unfortunately, I just don’t have the patience for that type of thing, plus this time of year with an unheated shop is a race against Northern Minnesota’s oncoming winter (It’s August 19th now.) Cost of this Project To Date This is a slight tangent to stripping a kayak, but many people seem to always want to know how much a kayak project like this will cost them. I’m not including plans, because I designed this kayak myself, and I’m not counting the over 200 hours of design time and calculations to arrive at the current boat being built. Also, please, understand that I had left over staples from my last canoe, and masking tape in the shop, and nails, and string, and sawhorses. I also own all the tools I needed, but as with any new woodworking project, you have to buy a new tool. I bought two: ear muffs, and a router. ($220 for both.) Assuming that I’ll have enough wood to finish the kayak, this is the cost of the project to date: Labor Cost of Materials Grand Total To Date: $1152.35 (with tax) Stuff to Buy Still What I Would Do Different So Far While striping the kayak, I’ve had a couple of thoughts about how to improve this internal strong back, which now that I’m using it, I’m starting to like. First, of course, is to use one of those laminated beams. Second, is at the stems, I ran the box beam into the stem, but I shouldn’t have had to do this. What I think would have given better alignment is if I had made the stem piece go all the way back to the 36″ form. I could have used this 36″ form to align the stem piece easier by squaring and securing the stem to the form. Then the form would be attached directly to the laminated beam via screws. Same as in the back. This would have left my box beam at 14 feet, instead of around 15 or so. It would have also avoided having to taper the box beam at the ends to make room for the strips as the taper down to the stems. Also, to support the stems and make for better alignment, if needed, a “T” shaped leg could have been built from 2x4s until enough strips were added to the kayak to support the stems securely. Third, in my plans I skipped the forms at 108″ and 96″, because I used one at 102″. This left 1.5 foot gaps instead of 1-foot gaps in the rest of the boat. On the next one I’d skip the 102″ form and use the 108″ and 96″ forms mainly because I’ve seen some slight flattening out in between the forms. It’s isn’t enough to concern me, because I was above waterline, but if this kayak turns out to be nice, then I’d fix it in the next version. Anyway, Back to Stripping The hardest decision during stripping the kayak was figuring out what to do on the bottom of the kayak for a design, but as I progressed to the bilge and just past it, my wood supply made that decision for me. My pine was running out, so with just 3.5 boards of cedar left, I knew I’d have to use cedar in the football of the kayak. Hopefully, I’ll have enough for the deck and won’t have to mill up more later. So, with a pencil and paper in hand I worked out some drawings as you can see below. In the end, I decided to stick with a simple design and do some inlay if so inspired to do so later. When you look at the picture of the finished hull, it looks like I spent a lot of time fiddling around with cutting the strips of pine to fit up against the strips of cedar, but I actually didn’t spend much time at all and this is how I did it. I first stapled the pine on to the hull and ended each pine piece just slightly longer than where the cedar would start. Then I cut the pine to the shape of my first cedar board. I stripped the cedar out just like you would with a normal book match bottom and then I only had to fiddle with the cuts on one side of the cedar. It worked out pretty nicely. And then the bottom was finished. I flipped the kayak, and I marched on to the deck…
Bryan Hansel