Building a Perfect Kayak: Part Ten
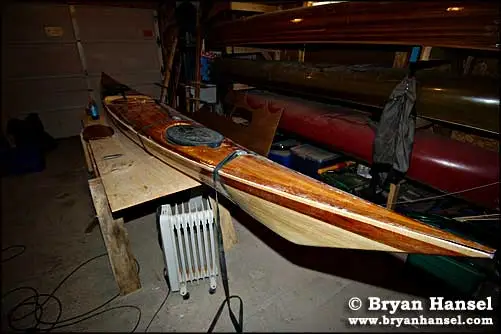
We may earn commissions if you shop through the links below. Last episode, I wrote about Free!Ship, and now with version 2 out, I’ve been able to recalculate by hydrostatics using the Free!Ship program to provide me with numbers that I had to calculate and figure by hand in the third episode of this builder’s log. With the new numbers, I’ve come up with some more realistic numbers for Resistance, and the like. Opps, I forgot to account for long tons when using FREE!ship. My calculations via hand and mind were actually closer than I thought. Here are the updated numbers: Design Name: Siskiwit Bay Length Overall: 17′ Beam: 21.5″ Volume: 11.81 cu. ft. Cockpit Size: 30″ x 15″ Coaming Height: Forward: 12 1/2″ Aft: 8 1/4″ Height of Seat: 1″ Weight: 45 pounds (est.) Center of buoyancy: 53.5% Hydrostatics calculated at 298 pounds Lwl: 14.945′ Bwl: 19.728″ Draft: 5.16″ Displaced Volume: 4.693 ft3 Block Coeff.: .4443 Prismatic Coeff: .5510 Midship Coeff: .80631 Wetted surface area: 21.041 ft2 KAPER I made an opps, and forgot that displacement in tons is in long tons, so my original calculations for 295 pounds in KAPER was incorrect. These are now the correct numbers: 2 knots .906 3 knots 1.883 4 knots 3.479 4.5 knots 4.842 5 knots 7.116 5.4 knots 9.673 These KAPER numbers compare closely to the Chatham and Romany Explorer. They are slightly better than the numbers for those two kayaks, but close enough that in usage, they probably won’t make much of a difference. These numbers are much better than the Chatham and the Romany Explorer. At 4 knots showing an 11% gain over the Chatham and a 4% gain over the Explorer. I guess, I’ll see soon. Finishing the Kayaks Cockpit Coaming Lip With the cockpit cutout and the riser mounted and glassed, I could move on towards the coaming lip. If you remember last episode I used thickened epoxy to form a bead around the riser and the hull so that the fiberglass would be able to conform to the curve better. This worked, but it is ugly. Next time, I would ignore this advice and just glass the riser pieces. Then let the epoxy set up for an hour or so, and come back and push the glass in if needed to make a nice clear joint. I did this on my compass mount, which you’ll read about below, and it worked out great. Anyway, with the glass on the rise set and dried, I cut with my circular saw (Anyone want to give me a nice tablesaw? I deserve it. I mean read everything that I’ve gone through on this boat build. Christmas is coming up.) some 1/8″ x 1/4″ strips of mahogany and pine to laminate onto the coaming and form a lip to hold on the spray skirt. On my skin-on-frame Greenland style kayak, I did the same thing. Even without fiberglass, this turns out to me a strong lip that is very easy to make. I ended up deciding on this type of lip, because I didn’t want to have to fiberglass the underside of the lip. I wasn’t worried about waterproofness, because I used a waterproof PU glue to hold the lip pieces together. The thin 1/8″ width of the pieces allowed me to bend the pieces without steaming them, but in several places to get them to bend, I had to use a heat gun. This process started a weeks worth of slooooooowwwwwwwww apparent progress, because I had to wait until the glue dried between adding parts. The glue takes about an hour to get to the point where I could add the next level of the coaming. So, one day was almost shot doing the lip. After the glue dried on the last part, I planed, sanded, and glassed over the lip. As you can see in the pictures, the mahogany has beautiful grain, and the single stripe of pine, I think, not only matches my kayak well, but also makes the mahogany stand out even more. Pat self on back. The Hatches (Where to Buy) I bought my KajakSport hatches from Newfound Woodworks Inc. They were friendly, quick to help me pick the right sizes, and also on the phone they gave me advice on how to mount them in my kayak without me having to ask. On the phone, they told me that they only had one of the bigger hatches, so that the second would come separately. I got the hatches the next week with the note showing that my backordered hatch would arrive almost two weeks later. A couple of days later, the backordered hatch showed up. This was much faster than promised. This is exactly the kind of service that a retailer should provide. Under promise and over deliver. I highly recommend Newfound Woodworks. Cut Outs For my cut outs, I ran a string line down the kayak again and lined the hatch lips up as much as I could. I cut the hole in the deck at the same size as the hatch lip. It turns out that in order to make hatches fit right; you have to cut the openings wider than the lips. In the rear hatches, because my rear deck is relatively flat, I ended up cutting an additional 1/2″ in order to accommodate the hatch cover and have enough room for the cover to fit into the deck easily. For the front, I had to cut this slightly wider. Just about an inch. Before I cut, I used some 2″ masking tape to mark the cut outs on the deck and then drew the openings on this tape. The tape made it easier to see the line and it also helps prevent tear out from the saw. The Rear KajakSport Hatches The rear hatches were the easiest. After I managed to cut the holes, I only had to make a recess into the deck a 1/2″ to 3/4″ deep. To do this I used plywood. For the oval hatch, I recessed it into the deck using three pieces of 1/4″ luan plywood, and then on the bottom of this recess, I attached a plywood lip to which I epoxied the plastic hatch rim. I roughed up the surface of the plastic hatch lip with 60 grit paper before mounting, and I mixed the epoxy with some wood flour to help glue the lip and fill any gaps that might occur from just using epoxy. The day hatch, I recessed 1/2″ using the same process as outlined above. I did use a ton of clamps to hold the plastic rims onto the plywood rims. After these dried and before I started the front hatch, I wanted to make sure this would be secure. It is. I can lift the weight of the kayak at this point using the glued in rims. The Front KajakSport Hatch The front hatch involved much more work than the back. I tried to do this two different ways. The first was using Jay Babina’s use of a wooden rim to make the recess into the front deck. It’s a great idea, and on the kayaks that I’ve seen with it built this way, it looks fantastic, but my woodworking skills weren’t up to the task of making an oval rim that not only fit around the hatch, but also fit into the oval cut out into my deck. I went through a full 1″x8″x8′ pine board trying to do this. The main problem was that in order to make the hatch cover top flush with the top of the deck I would have had to use two stacks of pine. When that failed I resorted to cedar strips, and I built a recess by angling short cedar strips down to a plywood lip I would use to mount the plastic hatch lip on. This worked out pretty well, but, I’m afraid that my wood working skill got lazy and the recess doesn’t look as good as it would have if I put more time into it. If I get around to it, I’ll hide my mistakes by making some black epoxy and filling in between the plastic hatch rim and the side of the recess. This will hide the brown epoxy/wood flour mix I used to make the transition from the plywood to the cedar smooth for fiberglassing. Anyway, I glassed the recess, and clamped the plastic lip in. It turned out looking pretty darn good. A Radical Idea? Next time, if I build an other kayak, I’d probably do wood hatches, because they are much much faster and much much easier to build, but if I were to put rubber hatches into a wood kayak, I’d do something completely different. Instead of gluing in plastic hatch rims, I’d build some out of wood. After looking at the plastic rims, I really don’t see anything to would stop this from working. Basically, the build would work the same way as building the cockpit coaming and riser, except in a smaller scale. Plastic Hatches the Downside The main disappointment with using commercial rubber hatches with plastic rims is the extra weight that it added to my kayak. The oval rubber covers weigh 1 pound 14 ounces each, and the day hatch weighs 11 ounces. I didn’t weigh the plastic rims before I mounted them into my kayak, but my guess is that they add a pound each. If I had used flush hatch covers, I would have used less plywood, so I imagine by using flush hatches my kayak would weigh somewhere around 7.5 pounds less. That’s a lot of weight to add to my kayak. Luckily, when I designed the kayak, I planned on around 45 pounds for the displacement of the boat, but, personally, I was hoping that I could bring it in under 40 pounds. I’ll take a lighter boat any day over a heavier one. Easier to carry, easier to put on top of the car, easier to paddle. But then again, you knew that. That’s probably why your reading this article on the only website completely devoted to lightweight canoeing and kayaking. The Compass Mount While mounting the hatches, and becoming frustrated that it took almost a whole week to do so, I decided to complicate my life more. Hip Hip Happy Happy Happy. I decided to build myself a compass mount to put in my Brunton neat-o compass. I bought this compass before I quit working at a sporting goods store, so I got it at cost. I originally planned on putting it into a Chatham 16, but the kayak was going to show up at the store after I knew I would be leaving, so about two month before the kayak got there I canceled it, and had a compass with no place to go. So, when I built my last kayak, I built a mount into the boat for the kayak. When I sold that kayak, I kept the compass, and now I decided to build a mount into this boat. I coat out a opening in front of the hatch, cedar stripped an angle from the deck to the plywood lip, fiberglassed, cut a hole out, and then had to come up with a way to build a fiberglass bubble to hold the compass. To do this, I filled a small square plastic container with plaster of Paris. Then I set the compass into this, and let it set up. After I pulled the compass out, I wet out some glass, and I put that into the newly made mold. I used the compass to compress the wet glass into the mold. After the fiberglass set up, I cut the flange from this part to size and glassed it into the deck using sand to hold it down. I used saran wrap to make sure nothing stuck to my compass, the mold, or to the sand. Inside of...
Bryan Hansel